Category: …….. Outils / Tools …………..


Purpose :

Having visualized the zones where the individual and autonomous treks are impossible according to the Nepalese regulations (hatched zones on the map), we have now to determine the zones of access to the Himalayan chain and establish a list. This work will allow to build projects in autonomy: targets, access, timetables, ascents, material to take, etc.

Provided that it can be used by the lovers of the Mountain, they can, in return, complete it or indicate my mistakes.

Map :

ght-nepal-restricted-areas-comp5

Click the photo twice, once from the article, once the photo itself, to have a satisfactory enlargement.

West to East Analysis :

The far  west is forbidden:

  • Muchu (5)
  • Darchula (12)
  • Bajhang (11)
  • Limi (5)

Zone A: a first theoretical possibility is to join Gorakh Himal from the Great Himalaya Trail ( GHT) from Rodikot for example.

gorak-himal-1

The ascent towards Kang and Namja is also forbidden (5) as well as the zone of Mugu ( 10 ). 

Zone B:  The lake Rara is a topic of discussions. Numerous testimonies contribute to assert that this zone is authorized.

lac-rara

Zone C: in the South of the region of Dolpa ( 1 ), we find the Chain of the Dhaulagiri. Accesses are maybe possible in the Dhorpatan National Park. Some villages are indicated Arjewa, Durja Khani. To explore this region, we can find side tracks, from East to West on the path leading to the Dhaulagiri base camp  (Beni, Dharapani, etc.).

churen-himal

Zone D : In the South of Upper Mustang ( 2 ) and Manang (9) zones, two interesting zones are opened; that of the Dhaulagiri by itself and of the massif of Annapurna. We’ll not analyse these zones the accesses of which are known – (Annapurna = the 2nd busiest trek). Nevertheless many original explorations are possible as, for example, the Annapurna North base camp.

Jusqu'au Camp de Base des AnnapurnaDSCF0811

Zone E : Between the park of Manaslu ( 3 ) and Rasuwa ( 6 ), a small zone could be opened giving onto Ganesh 3 and Paldor from the GHT, linked with Trisuli.

paldor

Zone F : Langtang, associated with Helambu. The trek to Kianjin gompa is  the 3rd busiest of Nepal. On the other hand, all the isolated region extending in the East and in the South of Kianjin, from which the high mountain begins, can be explored, by Tilman pass for example, etc.

 tilmanspass

By continuing eastward, the zone of Rolwaling, Dolakla ( 4 ), is also forbidden according to my interpretation of the regulations.

Zone G: Solukhumbu is globally accessible. The ascent towards Tibet from Thame seems nevertheless forbidden (Solukhumbu (8)) while all the trekkeurs without guide, making the Three High Passes of Khumbu trek, go without ever being stopped (as it is said and it is also our experience). It indicates all the gap existing between the regulations and their application by the local authorities 😉

Solukhumbu is the siege of the busiest trek of Nepal, up to the base camp of the Everest and Gokyo. It is necessary to note, nevertheless, many zones to be explored: regions of Khunde, Dudh Kund, the road leading to Amphu lapsta and towards Makalu. All these zones and probably many others are authorized, little frequented and easily accessible.

amphu-laptsa

Zone H : Makalu is also free and connected with Khumbu by West and Sherpani passes by difficult but authorized roads. The region on the West and in the South of the path leading to the base camp can be also explored freely: Isuwa valley, above Shersong, Barun glacier. These zones are little frequented. All other zones are forbidden (in the North and east of the main path): Sankhuwasaba ( 7 )

Sherpani pass

In the continuation and at Far East of Nepal, all the zone of high mountains ( Kanchenjunga) is unfortunately forbidden: Taplejung ( 1 )

In conclusion: 

The most frequented three treks, in the order: Khumbu towards EBC, Annapurna, and Langtang are situated in the rare accessible zones for autonomous trekkers. They are the widest authorized zones. Except for Annapurna, these zones are nevertheless in border with Tibet. We can thus be surprised by (and be delighted because most of the highest mountains are normally situated on the border) opportunities left by the regulations while all other border zones are forbidden…

These four zones (D, F, G) with H, being very wide, allow to get off the beaten track easily and to reach the high mountain if a meticulous preparation is made.

Finally, the other zones (A, B, C, E), maybe forgotten by the legislation, unknown and for the greater part difficult to access, can become the siege of ambitious projects.

It belongs to us to make our dream a reality!

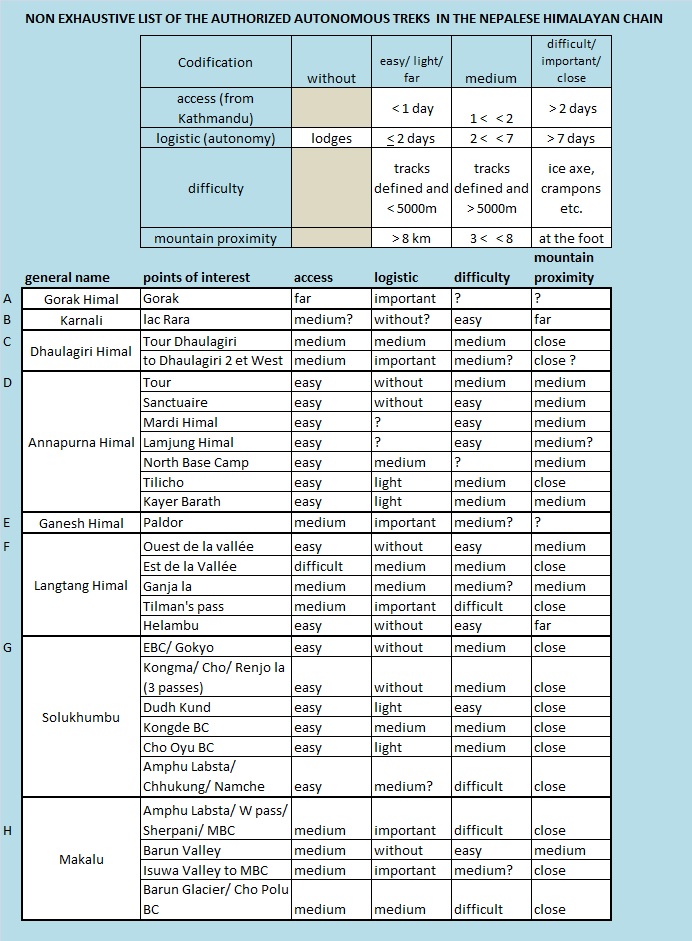
Summary table of the authorized autonomous treks

nepal-authorized-autonomous-treks-table


Objectif:

Après avoir visualisé les zones où le trek individuel et autonome est impossible selon la réglementation népalaise (zones hachurées sur la carte), il faut maintenant déterminer les zones d’accès aux hautes montagnes de la chaîne himalayenne et en établir une liste. Ce travail permettra de construire des projets en autonomie: cibles, accès, agenda, dénivelés, matériels à emporter, etc.

Pourvu qu’il puisse aussi servir aux amoureux de la Montagne, ils peuvent, en retour, le compléter ou m’indiquer mes erreurs.

Carte:


ght-nepal-restricted-areas-comp5

Cliquer deux fois sur la carte pour obtenir un agrandissement suffisant

Analyse d’Ouest en Est

l’extrême ouest est interdit:

  • Muchu (5)
  • Darchula (12)
  • Bajhang (11)
  • Limi (5)

Zone A : Une première possibilité théorique est de rejoindre Gorakh Himal à partir du Great Himalaya Trail (GHT) à partir de Rodikot par exemple.

gorak-himal-1

La remontée vers Kang la et Namja la est également interdite (5) ainsi que la zone de Mugu (10).

Zone B:  Le lac Rara porte à discussions. De nombreux témoignages concourent pour affirmer que cette zone est autorisée.

lac-rara


Zone C: Au sud de la région de Dolpa (1), nous retrouvons la chaîne du Dhaulagiri. Des accès sont peut-être possible dans le Dhorpatan National Park. Quelques villages sont indiqués Arjewa, Durja Khani. On pourra trouver des traverses d’Est en Ouest sur le chemin menant au camp de base du Dhaulagiri pour explorer cette région (Beni, Dharapani, etc).

churen-himal

Zone D : Au Sud des zones Upper Mustang (2) et  Manang (9), deux zones intéressantes sont ouvertes; celle du Dhaulagiri lui-même et du massif des Annapurna. Nous ne reviendrons pas sur ces zones dont les accès sont connus – (Annapurna 2ème trek le plus fréquenté). Il n’empêche que beaucoup d’explorations originales sont possibles comme, par exemple, le camp de base Nord de l’Annapurna.

Jusqu'au Camp de Base des AnnapurnaDSCF0811

Zone E : Entre le parc du Manaslu (3) et Rasuwa (6), une petite zone pourrait être ouverte donnant sur Ganesh 3  et Paldor à partir du GHT, rejoint par Trisuli.

paldor

Zone F : Le Langtang, associé à l’Helambu etc. dont le trek jusque Kianjin gompa est le 3ème plus fréquenté du Népal. Par contre, toute la région isolée s’étendant à l’Est et au Sud de Kianjin, à partir de laquelle commence la haute montagne, peut être explorée, Tilman’s pass etc.

 tilmanspass

En continant vers l’Est, la zone du Rolwaling, Dolakla (4), est également interdite selon mon interprétation de la réglementation.

Zone G : Le Solukhumbu est globalement accessible. La remontée vers le Tibet à partir de Thame semble pourtant interdite (Solukhumbu (8)) alors que tous les trekkeurs sans guide, effectuant le trek des trois Hauts Cols du Khumbu, passent sans jamais se faire arrêter (dit-on et c’est aussi notre expérience). Cela indique tout l’écart qui existe entre la réglementation et son application par les autorités locales… 😉

Le Solukhumbu est le siège du trek le plus fréquenté du Népal jusqu’au camp de base de l’Everest et Gokyo. Il faut noter, néanmoins, beaucoup de zones à explorer: régions du Khunde, de Dudh Kund, la route conduisant à Amphu lapsta la et vers le Makalu. Toutes ces zones et probablement beaucoup d’autres sont autorisées, peu fréquentées et faciles d’accès.

amphu-laptsa

Zone H : Le Makalu est également libre et relié au Khumbu par West pass et Sherpani la par des routes difficiles mais autorisées. La région à l’Ouest et au Sud du chemin menant au camp de base peut aussi être explorée librement : vallée d’Isuwa, hauts de Shersong, glacier du Barun. Ces zones sont très peu fréquentées. Toutes les autres zones sont interdites (au Nord et à l’Est du chemin principal) : Sankhuwasaba (7)

Sherpani pass

A la suite et à l’extrême Est du Népal, toute la zone de haute montagne (Kanchenjunga) est malheureusement interdite: Taplejung (1)

En conclusion: 

Les trois treks les plus fréquentés, dans l’ordre : Khumbu vers EBC, Annapurna, et Langtang se situent dans les rares zones accessibles aux trekkeurs autonomes. Ce sont les zones autorisées les plus larges. Sauf pour les Annapurna, ces zones sont pourtant en frontière avec le Tibet. On peut donc s’étonner (et se réjouir car la plupart des montagnes les plus hautes se situent normalement à la frontière) des opportunités laissées par la réglementation alors que toutes les autres zones frontalières sont interdites…

Ces quatre zones autorisées (D,F,G) avec H étant très larges, permettent de sortir facilement des sentiers battus et d’accéder à la haute montagne pour peu qu’une préparation minutieuse soit effectuée.

Enfin, les autres zones (A,B,C,E),  peut-être oubliées par la législation, inconnues et pour la plupart difficiles d’accès, peuvent devenir le siège de projets ambitieux.

A nous de passer du rêve à la réalité!

Tableau récapitulatif des treks autonomes autorisés


tableau-recap-treks-autonomes


Where can we walk in autonomy in the Nepalese Himalaya?

ght-nepal-restricted-areas-comp5


Click the photo twice, once from the article, once the photo itself, to have a satisfactory enlargement. The numbers  following the names of areas, refer to the lines of the Regulation’s appendix 12. The restricted areas are here only studied (hatched). Zones from A to G will be analyzed in another article  » Autonomous Nepal: Authorized Areas « 


Walking in the mountain contains in itself quite a lot of risks: errors in the assessment of the difficulties to be surmounted, an unfavorable or brutally aggressive weather, rockslides destroying the path on several kilometers, a degradation of the health (Acute Mountains Sickness, food poisoning, catching a cold), a fall, some equipment which breaks down, the attack of a yeti 😉 etc.

Do we have to add to this blacklist, the risk of an unannounced control, at the entry of a village, to be turned back for lacking of the compulsory permit and accompaniment? The Adventure could suddenly be transformed into collapse…

If the question is simple and frequently asked in the forums, the answers can confuse.

The experience can certainly speak: some crossed the control barriers without any permit. Others obtained a permit, thanks to an accommodating agency and left, alone, without any guide. Control points are not everywhere the same, the humor of the police changes as the weather. Passing in a place at a certain moment does not mean being able to pass always and everywhere. Baksheesh and Chance can enter the dance. Each can assess the acceptable level of risk  for his project.

We didn’t find a map to eliminate the risk of circulating in a restricted areas as autonomous trekkers.

The objective of this work is, thus, to position as exactly as possible all the today Restricted Areas on a map of Nepalese Himalaya.

But what does  the law says?


restricted-areas

The  » restricted areas  » are defined by the Nepalese regulations: Immigration regulation clause 39, 1994 Appendix -12. They are zones where only groups ( at least two trekkers) can legally enter, accompanied with a guide and sometimes with some liaison officer. A permit, obtained in the Department of the Immigration by an approved agency, is necessary before beginning the journey.

I hope that this work can be amended with the remarks and the precisions you will bring and for which I thank you in advance.


Où peut-on se promener dans les Himalaya népalaises en toute autonomie?

ght-nepal-restricted-areas-comp5


Cliquez sur la photo à deux reprises, une fois à partir de l’article, une fois sur la photo elle-même, pour avoir un agrandissement satisfaisant. Les chiffres, portés à la suite des noms de zones, renvoient aux lignes du tableau de l’annexe 12 de la réglementation. 

Pour cette première partie, seules les zones exclues sont étudiées. Les zones de A à G sont analysées dans l’article suivant « Népal Autonome : zones autorisées »

Marcher dans la montagne comporte en soi pas mal de risques: des erreurs d’appréciation des difficultés à surmonter, une météo défavorable ou brutalement agressive, des éboulements détruisant le chemin sur plusieurs kilomètres, une dégradation de la santé (Mal Aigu des Montagnes, intoxication alimentaire, refroidissement,…), une chute, le matériel qui tombe en panne, l’attaque d’un ours 😉 etc.

Doit-on ajouter à cette liste noire, le risque d’un contrôle inopiné, au détour d’un village, pour être refoulé faute du permis et de l’accompagnement obligatoires?  L’Aventure pourrait subitement se transformer en débâcle…

Si la question est simple et souvent posée dans les forums, les réponses sont imprécises.

L’expérience peut certes parler: certains ont franchi des barrières de contrôle sans permis. D’autres ont obtenu un permis grâce à une agence complaisante et sont partis, seuls, sans guide. Les points de contrôle ne se ressemblent pas, l’humeur des hommes change comme la météo. Passer à un endroit à un certain moment ne veut pas dire pouvoir passer toujours et partout. Bakchich et Chance peuvent entrer dans la danse. Chacun pourra apprécier le niveau de risque qu’il accepte pour son projet.

Nous n’avons pas trouvé de carte pour éliminer le risque de circuler dans une zone interdite aux trekkeurs autonomes.

L’objectif de ce travail est donc de positionner le plus précisément possible toutes les zones aujourd’hui interdites sur une carte des Himalaya népalaises.

Mais que nous dit la loi?

restricted-areas

Les « restricted areas » sont définies par la réglementation népalaise : Immigration regulation clause 39, 1994 Appendix -12. Ce sont des zones où seuls les groupes (au minimum deux trekkeurs) peuvent légalement se promener, accompagnés d’un guide et parfois d’un officier de liaison.  Un permis, obtenu au Département de l’Immigration par l’intermédiaire d’une agence agréée, est nécessaire avant d’entreprendre le voyage.

J’espère que ce travail pourra être corrigé avec les remarques et les précisions que vous apporterez et dont je vous remercie à l’avance.


(via tab « GPS / tableurs – spreadsheets »)

trajets réalisés comp

WayPoints are a posteriori placed on the track of the Google Earth satellite photo

Objectives:

1°) An Excel spreadsheet  has been created from the tracks recorded by the GPS during our treks. These spreadsheets will allow to visualize the stages, the ascents, the distances. They will allow, especially, to build a new project by modifying the stages.

2°) With the same spreadsheets, it will also be possible to send the points to Google Earth ( GE ) with the software GPSVisualizer, for changing a part of the track and generate a new treck on the same area.

Remark: The tracks recorded by the GPS are .kmz files. They are not downloadable on WordPress. It is not thus possible to give them directly but they can however be sent by email at the demand.

Modus Operandi:

1 °) to prepare a trek project from a realized route

The realized tracks have been transcribed in GE to a set of waypoints positioned on the tracks on which we traveled. The GPS has a precision of positioning of about ten meters and it is settled to record its position every 20m. It is thus necessary to take into account the resultant approximation during the use of these indicative datas.

All the points have been recorded in a GE file, exported and translated by GPSVisualizer from .kmz (datas GE) to .xlsx (datas Excel). At the end of this export, all the points for a given track, are recorded in a spreadsheet Excel allowing to show:

In Input :

  • The « GPS » worksheet with, for every GPS points: its name GE, its, if necessary, real name, its two coordinates and  its altitude, its distance tothe following point *, and the indication of a possible stage. The calculation gives slopes point by point and altitudes, ascents at the stage, and distance to the stages.

*The distances between points are rough and calculated on GE as the distance between points is not recorded by the GPS. It is thus necessary to make a statement by looking for the often frequent and acute bends in mountain. They are not always visible, particularly in forests. Approximations are thus inevitable.

In Output :

  • A timetable. It indicates the stages, the traveled distances, the ascent, and the altitude at the stages
  • The curve of the altitudes according to the traveled distance
  • The curve of the altitudes according to the stages
  • The graph of total ascents for every day, useful to plan reasonable stages and avoid the mountain sickness
    And for every trek, possible optional sheets.

The links towards these spreadsheets are recorded in the tab  » Tableurs – Spreadsheets  » under the « GPS » tab. They are referenced in regard to the corresponding logbooks in the tab  » Treks  »

2°) To send the waypoints on Google Earth:

We want now to do the inverse operation: to take the points from a spreadsheet and send them to GE. Click on http: // http://www.gpsvisualizer.com / map_input? Form=googleearth

Go to the box of datas and modify the first line of  titles as follows:  » name, latitude, longitude  » erasing  » desc « .  to make the three column « GE », « coord N » and « coord E » of « GPS »correspond.

After copying / pasting in a new sheet these three columns from the « GPS » sheet, it is then necessary to add a comma of separation following each name and following each latitude (possibility of making it automatically on Excel with the function « concatener »).

Click on  » create KML file ». It is not necessary to modify the other parameters of the software, the altitude being calculated on the ground, directly by GE.

Now, the three columns are copied and pasted in GPSVisualizer.

transcription Excel à GE comp

We just have to click on the name of the file .mkz created by GPSVisualizer to send the waypoints in GE. It is necessary to locate the way passing by every point. This is rarely a straight segment.

projection des points sur GE


Warning:

The users of this modus operandi are responsible for risks they take by venturing in mountain or somewhere else. The GPS is not enough either to protect from natural risks, and more, from faults of appreciation due to the lack of experience or to guarantee that the paths did not change. The mountain is always right, it is merciless with those who rub themselves without precaution and even sometimes with the others!


Au Coeur du Pays Sherpa : De Khandbari à Phaplu en passant par Dudh Kund

Khanbari, Chalise, Tendo, Djobari, Salpa, Gudel, Khiraule, Inkhu khola, Panggom, Jubhing, Nunthale, Taksindu la, Dudh Kund Pokhari, Phaplu

Les Trois Passes du Khumbu

Lukla, Namche bazar, CB Ama Dablam, Chhukung, Camp du Lothse, Kongma la, Periche, Gorakshep, CB Everest, Cho la, Gokyo, Renjo la, Namche bazar.

Le Tour du Dhaulagiri

Beni, Dharapani, Muri, Dobang, Camp des Italiens, French Pass, Hidden Valley, Marpha

Makalu de Num au Belvédère d’East Pass

Num, Seduwa, Tashigaon, Kongma, Dobate, Yangle karkha, Shersong, MBC, Sandy camp, Camp du Col

Vallée de Markha

Spituk, Jingchang, Ganda la, Shingo, Skiu, Sara, Markha, Hankar, Kongmaru la, Chuskyu, Sumdo


Guide pour l’Utilisation des Tableurs des Trajets Réalisés

(par Onglet GPS/tableurs – spreadsheet)

trajets réalisés comp

Les points sont placés a posteriori sur le tracé de la photo satellite Google Earth 

Objectifs:

1°) Un tableur Excel est créé à partir de chaque tracé enregistré par le GPS au cours des treks. Ce tableur permet de visualiser les étapes, les dénivelés, les distances réellement effectués. Il permet surtout de construire un nouveau projet en modifiant les étapes.

2°) Il sera possible, aussi, de projeter les points du tableur sur les photos de Google Earth (GE) avec le logiciel  GPSVisualizer

Remarque: Les tracés enregistrés par le GPS sont des fichiers .kmz. Ils ne sont pas téléchargeables sur WordPress. Il n’est donc pas possible de les mettre à disposition directement. (ils pourront cependant être envoyés par email à la demande).

Mode Opératoire:

1°) préparer un projet de trek à partir d’un trajet réalisé

Les trajets réalisés sont transcrits par un ensemble de points sur les photos satellites de Google Earth, positionnés sur les chemins que nous avons parcourus. Le GPS a une précision de positionnement d’une dizaine de mètres et il est réglé pour enregistrer sa position tous les 20m. Il faut donc tenir compte de l’approximation résultante lors de l’utilisation de ces données indicatives.

L’ensemble des points est enregistré dans un dossier GE puis exporté à l’aide de GPSVisualizer. A l’issue de cette exportation, l’ensemble des points pour un tracé donné, est consignée dans un tableur Excel permettant d’afficher :

En entrée :

  • la feuille de calcul « GPS » avec, pour chaque points GPS: son nom GE, son nom réel si nécessaire, ses deux coordonnées, son altitude, sa distance au point suivant*, et l’indication d’une étape éventuelle. Le calcul donne les pentes point par point et des altitudes, dénivelé, distances aux étapes

*Les distances entre points sont approximatives et relevées sur GE. En effet, la distance entre points n’est pas enregistrée par le GPS. Il faut donc faire un relevé en recherchant les virages souvent fréquents et aigus en montagne. Ils ne sont pas toujours visibles, particulièrement en forêts.  Des approximations sont donc inévitables.

En sortie :

  • Un agenda. Il indique les étapes, les distances parcourues, les dénivelés, et l’altitude aux étapes
  • La courbe des altitudes en fonction de la distance parcourue
  • La courbe des altitudes en fonction des étapes
  • Le graphique des dénivelés totaux pour chaque jour, utile pour prévoir des étapes raisonnables et éviter le mal des montagnes
  • Et pour chaque trek des feuilles optionnelles éventuelles.

Pour chaque trek réalisé, un tableur est constitué. Les liens vers ces tableurs sont enregistrés, au fur et à mesure, dans l’article « Tableurs des tracés réalisés / Spreadsheets of the realized traces » sous l’onglet « GPS ». Ils sont référencés par rapport aux livres de bords correspondants dans la rubrique « Treks »

2°) Projeter les points du trajet sur Google Earth:

Il s’agit de faire l’opération inverse. aller sur http://www.gpsvisualizer.com/map_input?form=googleearth

Aller dans la boîte de données et inscrire les intitulés en les modifiant comme suit : « name, latitude, longitude » (effacer « desc ») pour faire correspondre chaque colonne à son intitulé.

Il faut ensuite ajouter une virgule de séparation à la suite de chaque nom et de chaque latitude (possibilité de le faire automatiquement sur Excel).

Cliquer sur « create KML file ». Il n’est pas besoin de modifier les autres paramètres du logiciel, l’altitude étant calculée au sol, directement par GE.

Cette fois, les trois colonnes des points de la feuille « GPS » du tableur, correspondant au nom et aux deux coordonnées sont copiées et collées dans GPSVisualizer.

transcription Excel à GE comp

Il suffit de cliquer sur le nom du fichier en .mkz créé pour projeter les points dans GE. Il faut repérer le chemin passant par chaque point. Celui-ci est rarement un segment de droite.

projection des points sur GE


Avertissement:

Les utilisateurs de ce mode opératoire sont responsables des risques qu’ils prennent en s’aventurant en montagne ou ailleurs. Le GPS ne suffit ni à protéger des risques naturels,  encore moins des fautes d’appréciation liées au manque d’expérience ni à garantir que les chemins n’ont pas changé. La montagne a toujours raison, elle est implacable avec ceux qui s’y frottent sans précaution et même parfois avec les autres!


Generate a Roadmap Project

situationExample of a project to generate

Foreword:

Our freedom is our most precious good. I am Charlie and will remain Charlie, I’ll never forget the attacks committed against the Freedom in Paris on January 7th, 8th and 9th, 2015

Our most precious good can be divided infinitely without shrinking. That is why this modus operandi is put at the disposal of trekkers, avid to leave for autonomy into the mountain – or somewhere else 🙂

This provision completes the collection of logbooks (Tab Treks), with this hope to get in return your contributions, remarks and improvements as well as your routes which can widen our library.

The users of this modus operandi are responsible for risks they take by venturing into mountain or somewhere else. The GPS is not enough either to protect against natural risks, and even more, from faults of appreciation due to the lack of experience or to guarantee that paths didn’t change. The mountain is always right, merciless with those who engage themselves without precaution and even sometimes with the others!

Objectives:

When we want to create a route in a region for which there are no data to be automatically imported in the GPS (case of Nepal, India), it is necessary to create this route by ourself.

Modus Operandi:

A route is a set of segments taking place by points following each other. Every point defines itself by its name, its GPS coordinates, its altitude and the distance connecting it with the following point. Every point is named and contained in a file.

The routes must be created with a sure support, supplying these four source data: name, both coordinates, altitude and distance between points. The support, here, is Google Earth (GE).

1st stage:  Identify the points by which the route will pass. They are named and placed one by one on the support (GE), in a specific file.

The number of points depends on:

  • the precision we wish to have and
  • the capacity to reveal where the route really goes (forests, non-existent paths, inaccuracies of the satellite photo)

écran point GE EN comp

satellite photo on Google Earth

Second stage: the file must be then exported towards the spreadsheet given at the end of article:

  • Either manually towards the « GPS » sheet. For that purpose, look for every point for coordinates, copy and paste in the corresponding cells of the line attributed to the point, copy then its altitude.
  • Or automatically, with GPSvisualizer. In this case, which is to be favored because it’s much less boring,
    • Record the GE file of the points of the route in a directory of your computer
    • Go then on GPSvizualiser (http: // http://www.gpsvisualizer.com / convert_input). Ask for the extraction of the altitudes ( » add Dem elevation data « ) then convert the file (it is a .mkz) in a » plain text  » file.
    • This  » plain text  » file is then opened and copied ( » select everything  » then ctrl V) to be pasted in a  blank Excel sheet.
    • Locate the four columns corresponding to three source data: the name, the coordinates, the altitude

GPSVisualizer EN comp

GPSvisualizer Input mask


GPSVisualizer2 EN compGPSvisualizer converted datas in text 

GPSVisualizer3 EN comp The file is pasted on a blank excel sheet

  • Having made sure that the number of points is lower than lines in the « GPS » sheet, paste the data column by column in the « GPS » sheet. If GE name is not the same that those of the places, indicate the names of the real places in the column  » nom GE ou nom du lieu si différent de nom GE » (column D). If GE name are identical to the names of places, when they exist, paste names GE in the column  » nom GE ou nom du lieu si différent de nom GE » (column D). In this column, the names of Night Stages will be extracted by the calculation. If there is not enough lines, it is necessary to insert new lines then of refresh* the computation zone ( grey zone at the middle of the screen).
  • Collect the distances between every point and complete the « GPS » sheet. It is often necessary to make a record by looking for the frequent and important bends of the route in mountain. They are not always visible, particularly in forests. Approximations are thus sometimes inevitable. The indication of the slope calculated between points allows in this case to estimate a probable distance.
  • It just remains to determine the Nights Stages by indicating « n » in the cells in intersection between column for « N » and the line of the point for the night stage. This can be repeated by modifying the positions of « n » to obtain compatible stages with the objectives (duration, distances, elevation)
  • The spreadsheet calculates slopes,elevation, total distance at the stages.

feuille GPS vierge EN comp
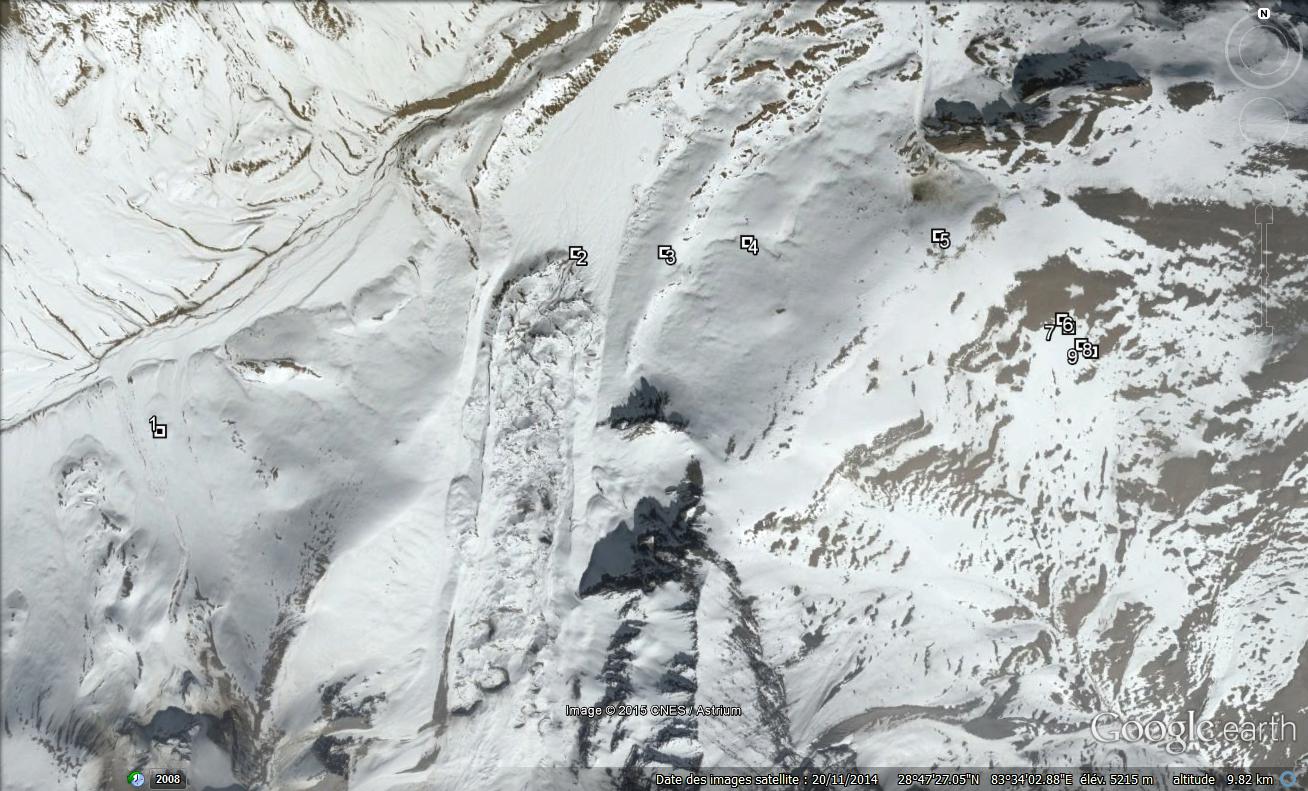
The spreadsheet « GPS » without data

feuille GPS renseignée EN comp

The spreadsheet « GPS » is now filled

*Possible refreshment of a calculation area:

When cells are deleted or added in the data zone (white zone to the left), the values of certain calculation cells (grey zone in the middle) become false in the lines following the addition or the deletion. In this case, select as indicated in photos below, calculation cells of a line above the zone of addition / deletion (column K to T) (1) point the low corner at the right of the selected zone, left click of the mouse ( 2 ), come down to the bottom of the calculation zone by maintaining the left click of the mouse (3) 🙂

rafraichissement1 compThe deletion of a line pulls an error on computation zones

rafraichissement2 comp (1) and (2) Select the calculation zone on a line above and click at the low right corner

rafraichissement3 comp (3) By maintaining the left click of the mouse, come down to the bottom of the calculation zone


On output, we find:

A timetable. It indicates the stages, the daily elevation, the traveled distances and the altitudes at night stages

0001c

Remark: for the presentation, the zones of the schedule not informed by the calculation (trek shorter than 23 days) can be manually completed with information on the journey following the trek.

A curve of the altitudes according to the traveled distance (names of maxima to be manually added)

0001b

A curve of the altitudes at night stages (names of the stages to be manually added)

0001a

A graph of total elevation for every day, useful to plan reasonable stages and avoid the mountain sickness (advice: elevation / day < 500m)

0001d

Remark: The rule of 500m / j max is not respected in this example for days 2, 7 and 10

Spreadsheet: tableur vierge

To the possible users: thank you for bringing your support by commenting and by proposing your improvements and complements


Générer la Carte d’un Projet de Trajet

situationExemple de trajet à générer

Avant propos:

La liberté est notre bien le plus précieux. (Je suis et resterai Charlie, je n’oublierai jamais les attentats perpétrés contre la Liberté à Paris les 7, 8 et 9 janvier 2015)

Notre bien le plus précieux peut se partager à l’infini sans qu’il rétrécisse. C’est pourquoi ce mode opératoire est mis à la disposition des trekkeurs désireux de partir en autonomie dans la montagne – ou ailleurs 🙂

Cette mise à disposition complète la collection des livres de bord (Onglet Treks), avec cet espoir d’obtenir en retour vos contributions, remarques et améliorations ainsi que vos trajets qui pourront élargir notre bibliothèque.

Les utilisateurs de ce mode opératoire sont responsables des risques qu’ils prennent en s’aventurant en montagne ou ailleurs. Le GPS ne suffit ni à protéger des risques naturels,  encore moins des fautes d’appréciation liées au manque d’expérience ni à garantir que les chemins n’ont pas changé. La montagne a toujours raison, elle est implacable avec ceux qui s’y frottent sans précaution et même parfois avec les autres!

Objectif:

Lorsque l’on veut créer un trajet dans une région pour laquelle il n’existe pas de données à importer automatiquement dans le GPS (cas du Népal, de l’Inde), il est nécessaire de créer ce trajet par soi-même.

Mode Opératoire:

Un trajet est un ensemble de segments passant par des points qui se suivent. Chaque point se définit par ses coordonnées GPS, son altitude et la distance le reliant au point suivant. Chaque point est nommé et contenu dans un dossier.

Les trajets doivent être créés sur un support sûr, fournissant ces quatre données de base: nom, les deux coordonnées, altitude et distance entre points. Le support choisi est Google Earth (GE).

1 ère étape:  Identifier les points par lesquels passera le trajet. Ils sont nommés et placés un par un sur le support (GE), dans un dossier spécifique.

Le nombre de points dépend :

  • De la précision que l’on souhaite donner et
  • De la capacité à déceler où passe réellement le trajet (forêts, chemins inexistants, imprécisions de la photo satellite)

écran point GE comp

Photo satellite donnée par Google Earth

Seconde étape: Le dossier doit ensuite être exporté vers le tableur, il est donné en fin d’article:

  • Soit manuellement vers la  feuille « GPS ». Pour cela, chercher pour chaque point les coordonnées, copier et coller dans les cases correspondantes de la ligne attribuée au point, copier ensuite son altitude.
  • Soit automatiquement , à l’aide de GPSvisualizer . Dans ce cas, qui est à privilégier car il est beaucoup moins fastidieux,
    • enregistrer le dossier GE des points du trajet comme fichier dans un répertoire de votre ordinateur (dans GE: « enregistrer le lieu sous »)
    • aller ensuite sur GPSvizualiser (http://www.gpsvisualizer.com/convert_input). Demander l’extraction des altitudes (« add dem elevation data ») puis convertir le fichier (il est en .mkz) en fichier « plain text ».
    • Ce fichier « plain text » est ensuite ouvert et copié (« sélectionnez tout » puis ctrl V) pour être collé dans une feuille excel vierge.
    • repérer les quatre colonnes correspondant aux trois données de base : le nom, les coordonnées, l’altitude

GPSVisualizer compMasque de saisie de GPSvisualizer


GPSVisualizer2GPSvisualizer a traduit les données en texte 

GPSVisualizer3 comp Le fichier est collé sur une feuille excel vierge

  • Après s’être assuré que le nombre de points est inférieur au nombre de lignes dans la feuille GPS, coller les données colonne par colonne dans la feuille « GPS ». Si les noms GE ne sont pas les mêmes que ceux des lieux, indiquer les noms des lieux réels dans la colonne « nom GE ou nom du lieu si différent de nom GE« . Si les noms GE sont identiques aux noms des lieux, lorsqu’ils existent, recopier les noms GE dans la colonne « nom GE ou nom du lieu si différent de nom GE« . En effet, c’est dans cette dernière colonne que les noms d’étapes seront cherchés au moment du calcul.  S’il n’y a pas assez de lignes, il suffit d’en insérer puis de rafraîchir* la zone de calcul (zone grisée).
  • collecter les distances entre chaque point et renseigner la feuille « GPS ». Il faut donc faire un relevé en recherchant les virages souvent fréquents et aigus en montagne. Ils ne sont pas toujours visibles, particulièrement en forêts. Des approximations sont donc parfois inévitables. L’indication de la pente calculée entre points permet dans ce cas d’évaluer une distance probable.
  • Il ne reste plus qu’à déterminer les étapes en indiquant « n » dans la case intersection entre colonne « N » et la ligne du point de l’étape. Cette recherche peut être réitérée en modifiant les positions des n pour obtenir des étapes conciliables avec les objectifs (durée, distances, dénivelés)
  • Le tableur calcule les pentes les dénivelés, distances aux étapes.

feuille GPS vierge compla feuille de calcul « GPS » vierge

feuille GPS renseignée comp

la feuille de calcul « GPS » est maintenant renseignée

*Rafraîchissement éventuel d’une zone de calcul:

Lorsque des cellules sont supprimées ou ajoutées dans la zone des données (zone blanche à gauche),  les indices de certaines cellules de la zone de calcul (zone grisée au milieu) deviennent fausses dans les lignes à la suite de l’ajout ou la suppression. Dans ce cas, sélectionner comme indiqué dans les photos ci-dessous, les cellules de calcul d’une ligne au dessus de la zone d’ajout/suppression (colonne K à T) (1), pointer le coin bas et droite de la zone sélectionnée, clic gauche de la souris (2), descendre jusqu’au bas de la zone de calcul en maintenant le clic gauche de la souris (3)   🙂

rafraichissement1 compla suppression d’une ligne entraîne  une erreur sur les zones de calcul

rafraichissement2 comp (1) et (2) sélectionner les zones de calcul sur une ligne au dessus et pointer sur le coin bas droit

rafraichissement3 comp (3) en maintenant le clic gauche de la souris descendre jusqu’en bas de la zone de calcul


En sortie, on trouve:

Un agenda. Il indique les étapes, les dénivelés, les distances parcourues et l’altitude aux étapes

0001c

Remarque: pour la présentation, les zones de l’agenda non renseignées par le calcul (trek inférieur à 23 jours) peuvent être complétées manuellement avec des informations sur le voyage à la suite du trek.

la courbe des altitudes en fonction de la distance parcourue (noms des maxima à ajouter manuellement)

0001b

la courbe des altitudes aux étapes (noms des étapes à ajouter manuellement)

0001a

le graphique des dénivelés totaux pour chaque jour, utile pour prévoir des étapes raisonnables et éviter le mal des montagnes (conseil: dénivelé/jour < 500m)

0001d

remarque :  les 500m/j max ne sont pas respectés dans cet exemple pour les jours 2, 7 et 10

Tableur de calcul: tableur vierge

Aux utilisateurs éventuels, merci d’apporter votre soutien en commentant et proposant vos améliorations et compléments